When you fully understand and know how to program the possibility of making cool think are infinity. But first you have to learn the basic of programing to becoming pro. One of the basic thing I learn when I started Scratch and Arduino is how to blink and fade. I will show you how I did blink and fade in both Scratch and Arduino.
Blink
In Scratch blink can be easy for some people, but it’s good practice when you join Scratch for the first time.
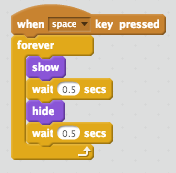
This is the code to blink.
First you create a sprite in Scratch. It doesn’t matter what it is. Then you could give a condition when to to do it, in this case it will blink when you press the space key. Then I put it into a loop so it will do it forever and thats what the loop does repeat. Then I said to show on the screen and wait for half a seconds. Then it will hide or disappear and wait for half a seconds. Then it will repeat that forever until you disconnect. Now your spirit will show and hide like it blink. And thats how you make something blink in Scratch.
In Arduino the way to blink is connecting a LED. Turns on an LED on for one second, then off for one second, repeatedly. To do that you have program you Arduino.
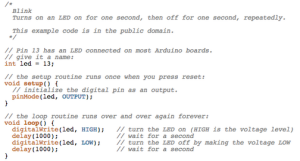
This is the code to blink in Scratch.
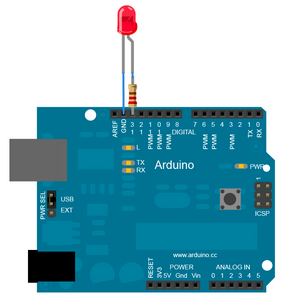
This picture shows where you will put your LED.
When you connect your LED to the way that is shown above you have to program your circuit in order to blink. The code for it to blink is in the picture above. First part of the code is you have create a variable shows where you put your LED.  int meant that it’s a integer and the value will be a number. I named the variable LED, but you can call it whatever you like. The value of this variable is 13 because that is where you are plug in your LED. Then the setup routines runs once when you press the reset.
  In this piece of code you are initialize the digital pin as an output. What it means is that the LED will be an output, the power will go out from the computer to Arduino. After that you will write the loop to run your program over and over just like in Scratch.

This is the loop for your LED.
In that loop “digitalWrite” is something that write a HIGH or a LOW value to a digital pin. High mean high voltage and on, Low mean no voltage and off. First it turn on the LED (HIGH) and delay for 1 second. One second is divided into 1000 milliseconds so every thousand is one second. Then it turn off your LED (LOW) and wait for one more second. And then it will repeat that forever until you reset and it will blink.
Fade
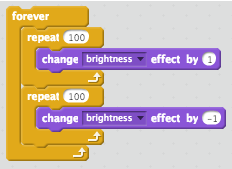
This is the code to fade in Scratch.
Another word for fade would be brightness. In order to fade out and in forever the code above in the picture could be useful. First you want to use the forever block because I want the sprite to fade out and in forever. Then I use the repeat block and I want to repeat it for 100 times. Then I went to looks category and use this block  But the problem is that in that block it said change (color) effect by 25. But I don’t want the color to change, I want to change the brightness which would be fade in that case.

I clicked that small down arrow key and it bring the section where you can change the different thing in your sprite. So then you have to choose the brightness. Then that block will say “change (brightness) effect by (25)”. But if I change the effect by 25 it will go so fast you might not be able to see. So I change to 1 so you can see that the brightness is changing. Then that loop will say that change the brightness effect by (1) 100 times. This will make your spite so bright you will not be able to see it. So you want to fade out. In order to do that you have to write that repeat loop again, but you to change something:

But now you have to say change the brightness by (-1) so it will fade out and will be able to see it the screen. And you write that two loop inside of the for loop so your sprite will automatically fade in and out forever until you reset your program.
In Arduino if you want to fade something such your LED you have to build a circuit. In order to build that circuit that will fade in and out you need some hardware required such as Arduino board, Breadboard, a LED, and a 220 ohm resistor.
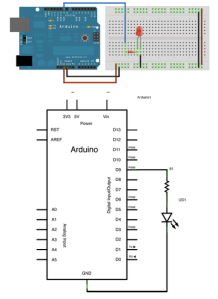
This two picture shows how to build the circuit.
After you build your circuit you have to program you code and the code for it is:
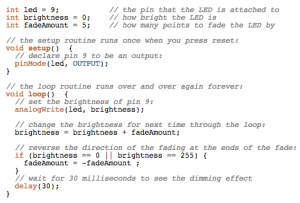
When you program your circuit first thing you need to do is make couple of variable. First variable you need to make is  This variable shows that the pin that the LED is attached to. Then
  This one shows how bright the LED is. Last
  This one shows how many points to fade the LED by. After that you have to set up the routine that runs once when you press reset.
  This declare pin 9 to be an output. That the power will go out. Then you have to write the loop routine runs over and over again forever.
  This sets the brightness of pin 9. Then you have have to change the brightness for the next time through the loop.
  Then you reverse the direction of the fading at the ends of the fade.
  So if the brightness is 0 change it by 5 and when it reach to 255 then change the brightness by -5. But then you have to
  You delay for 30 milliseconds to see the dimming effect. Now you LED should fade in and out as long as you don’t disconnect it.
For more information about Arduino you can check out this website. And this project I made in Scratch show how to fade and blink in Scratch.
by: Tareq